Thursday, 23 August 2012

Tutorial 4: Basic Blouse with Diamond dart

Measurements needed: shoulder, bust, bust point, waist, back half length, hips, round neck, arm hole, blouse length, neck depth and bust span.

Calculations Needed:

  1. shoulder/2 + 0.5
  2. bust point + 0.5
  3. bust/4 + 1"
  4. back half length + 0.5
  5. waist/4 + dart allowance + 1"
  6. blouse length + 1.5"
  7. hips/4 + 1"
  8. Bust apart/2 + 0.5
  9. round neck/6 + 2 or 3" (for neck width, depending on how wide you want it)
PROCEDURE:
  • Fold your pattern paper into 2 and Measure the neck width X and depth J ( i usually use 3" for both because i like high necks) from the folded tip marked O.


  • Join X and J using a french curve for a round neck ( you can use any other neck block you want)


  • Measure the shoulder from O and this is labelled point D, take 1" below point D (D1) and join to X. This gives the slope of the shoulder.


  • From point O, measure the bust point A, back half length B and blouse length C vertically along the folded side of the paper.


  • Draw  horizontal straight lines from these points


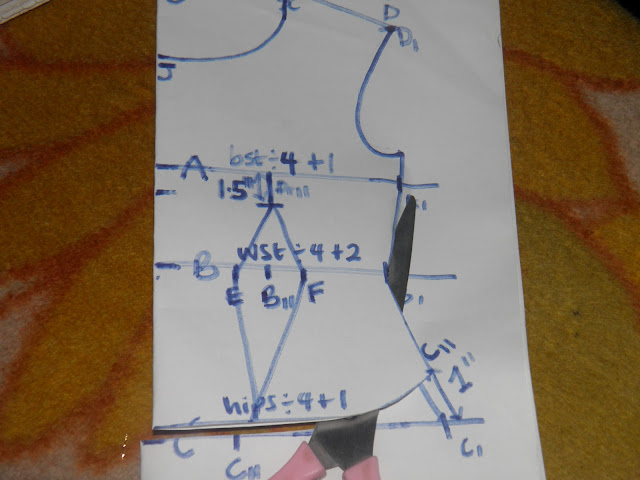
  • Measure bust along line A line (A1), waist along line B line (B1) and hips along line C line (C1) and join the points to give the outline of the top.


  • Measure 1.5" above the bust line and join point D1 ( tip of shoulder line) to the point using a french curve, this will give you the armhole


  • Measure 1" upward from C1 and curve into length of the top. This is to give the edge a bit of shape.


  • Measure bust  apart on the bust line(A11), waist line (B11) and hip line (C11)


  • Measure 1.5' below A11 and mark this point


  • Measure 0.5" on either sides of B11 and mark


  • Join the point below A11 to the 0.5" on either sides of B11 and to C11. This should give you a diamond shaped dart.


  • Cut out along the outline of the top.
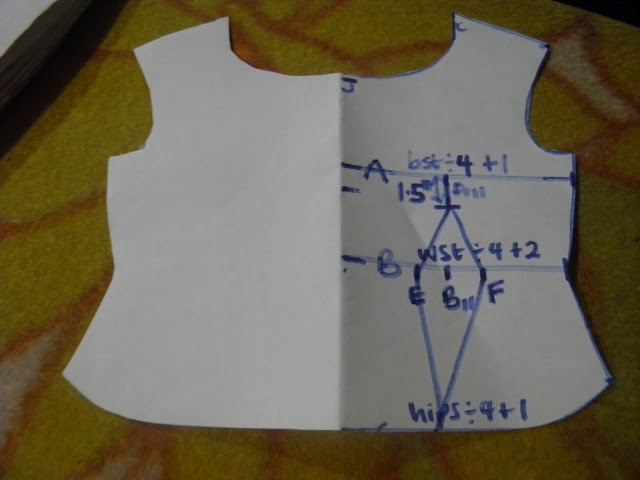


See how easy it is; you can also include your under and upper bust measurement for more fitting.
Enjoy and keep visiting.......

Saturday, 26 May 2012

Tutorial 3: Bustier top Pattern


Measurements needed: shoulder, upper bust ( for boob tubes/ corset tops), bust point ( from the highest point of the shoulder to the nipple), bust, bust apart ( distance between the nipples), under bust, back half length ( the highest point of the back to the deepest point of the back), waist, blouse length and hips.

Calculations Needed:
  1. shoulder/2+0.5
  2. upper bust length+0.5
  3. round upper bust/4+dart allowance+1" (sewing allowance)
  4. bust point+0.5
  5. bust/4+dart allowance+1"
  6. under bust length+0.5
  7. Round under bust/4+dart allowance+1"
  8. back half length+0.5
  9. waist/4+dart allowance+1"
  10. blouse length+1.5"
  11. hips/4+dart allowance+1"
  12. Bust apart/2+0.5
Dart allowance should be 2.5"

PROCEDURE:
  •  Measure the neck width A and depth B ( i usually use 3" for both because i like high necks) from the folded tip marked O.
  • Join A and B using a french curve for a round neck ( you can use any other neck block you want)
  • Measure the shoulder from O and this is labelled point C, take 1" below point C and join to A. This gives the slope of the shoulder.
  • From point O, measure the bust point D, back half length E and blouse length F vertically along the folded side of the paper.
  • Draw  horizontal straight lines from these points.
  • Measure bust along line D, waist along line E and hips along line F and join the points to give the outline of the top.
 
 
  • Measure 1.5" above the bust line and draw a straight horizontal line  
 
  • Join point C1 ( tip of shoulder line) to the horizontal line using a french curve, this will give you the armhole.
 
  • From point O, measure under bust length vertically and draw a horizontal line from that point
 
  • Measure bust  apart on the bust line, under bust line, waist line and hip line.
 
  • Draw a vertical line through the points and measure 0.5" to the left of the line and 1.5" to its right
 
  • Join  armhole to point on the bust line with a curve/cup as shown above
 
  • Cut along the lines


Thursday, 12 January 2012

Tutorial 2: Pleats

Pleats are very easy to create. They are angular shapes made by folding. It is also known as a crease. There are 3 different types of  pleats:
  • knife pleat
  • box pleat and 
  • kissing pleat
Measurements needed: band/waist, skirt length
calculations needed:
  1. waist + 1.5" ( 1.5" for zip allowance)
  2. skirt length + 1.5" ( 1.5" sewing hem allowance)
     To get the length of material needed to create the pleats required, you multiply the width of each pleat by the number of pleats desired.

      FOR EXAMPLE:
  1. knife pleats : If I wanted a skirt with 24 pleats (like the one i was wearing in my first post; the green one) of width 2" , the length of material needed will be
                                              2" * 24 * 3"     (we multiply by 3" too because to create a knife pleat fold up , you fold over 3 times) as illustrated below. Do not forget to leave your zip allowance at both ends of the material.


2.  Box/ kissing pleat: if i wanted a skirt with 5 box pleats of width 4", the length of material needed will be
                                4" * 5 * 6" ( 6" because to create one box pleat, you fold over 6 times)


      Ensure to measure the length after folding. This is to check if it matches your waist measurement; if not, adjust folds slightly till they meet your requirements.
         Enjoy and keep visiting........

Sunday, 8 January 2012

Tutorial 1: Pencil skirt Pattern Drafting


Hi guys,
        As promised, I'm posting my first do it yourself tutorial today. Pattern drafting, crafting and sewing are quite similar to engineering because it involves a lot of calculations, dexterity and an undivided thought process. We are going to pattern a pencil skirt today; so lets get started.......
Measurements needed: band / waist , hip-line , hips , skirt length. for those who don't know, the hip-line measurement is a vertical measurement from your band/waist to the fullest part of your hips.
Tools needed: tape rule , french curve , marker, scissors and ruler.
Calculations needed: these derived measurements are the ones used through out the drafting.
  1. waist/2 + 1" ( the 1" for sewing allowance)
  2. hip-line + 0.5"
  3. hips/4 +1+1 (1" sewing allowance)
  4. skirt length + 0.5" + 1 " (1" sewing allowance)
PATTERN DRAFTING PROCESS

  • get your drafting paper and fold into 2 making sure there is enough space to accommodate your measurements.
  • Mark O at the folded tip of the paper and measure horizontally  the derived waist measurement which terminates at D.
  •   Measure the derived hip-line vertically along the folded tip from O and mark A. From A measure horizontally  the derived hip measurement which terminates at C. 
  • from O, measure vertically the derived skirt length and mark B. From B measure horizontally the derived hip measurement but this time subtracting  1" or 1.5" as desired. This terminates at E.
  • Join D to C with a french curve or your free hand to give a slight curve.

  • Join C to E in a straight line and cut out along  B,E,C and D.

  • Open up the paper to give the front half of your skirt.
  •  To cut the back half, place the front half pattern on another folded drafting paper leaving at least 1.5" room for zip, other wise known as the zip allowance.

  •  To attach the zip, the back half is slit through the middle and the taken in at both sides by 1.5". the zip is sewn along this allowance

There it is........... please leave your comments and questions.